ラビップルにアニメのような動きをつけ、より躍動感のあるかわいさを実現したいと思います。
画像を分割する
アニメーションの仕組みは、パラパラ漫画と同じです。
一コマずつちょっと違う画像を複数枚用意し、それらを連続させて動きを表現します。
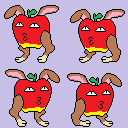
今回は以下のような画像を用意しました。

この画像を四つに分割し、数秒おきに一枚ずつ描画することで動いているように見せます。
画像を分割し、リストに格納する関数を、tools.pyファイルに記述します。
def split_image(image, n, m):
    image_list = [] # 空のimage_listを作成
    w = image.get_width() #imageのwidthを取得
    h = image.get_height() #imageのheightを取得
    w1 = int(w / n) # 一枚あたりのwidth
    h1 = int(h / m) # 一枚あたりのheight
    for i in range(0, h, h1):
        for j in range(0, w, w1):
            surface = pygame.Surface((w1, h1))
            surface.blit(image, (0, 0), (j, i, w1, h1))
            surface.set_colorkey(surface.get_at((0, 0)), RLEACCEL)
            surface.convert()
            image_list.append(surface)
    return image_list # image_listを返す
for文の中で、画像一枚分の大きさのSurfaceを作成し、指定した座標から一枚分の大きさを切り取って貼り付けています。
作成したSurfaceはimage_listに格納し、最後に戻り値としてimage_listを返すようになっています。
アニメーションを実装する
#!/usr/bin/env python
import pygame
from pygame.locals import *
import sys

import cursor, tools

SCR_RECT = Rect(0, 0, 640, 480)

class Main():
    def __init__(self):
        pygame.init()
        pygame.display.set_caption("sample")
        screen = pygame.display.set_mode(SCR_RECT.size)

        self.font = pygame.font.Font("data/minamoji04.ttf", 80)
        self.title = self.font.render("ラビップルの冒険", True, (0, 0, 0))
        self.start = self.font.render("はじめる", True, (0, 0, 0))

        # アニメーション
        self.frame = 0
        self.animecycle = 24
        # ラビップルの向き(0が左向き、1が右向き)
        self.direction = 0

        # 画像をロードし、分割する
        self.images = tools.split_image(tools.load_image("data", "rabipple.png"), 2, 2)
        self.image = self.images[0]
        self.x = 288
        self.y = 200
        self.speed = 5

        self.bg = tools.load_image("data", "bg.png")

        self.cursor = cursor.Cursor(90, 330, (0, 0, 0))

        clock = pygame.time.Clock()
        while True:
            clock.tick(30)
            self.update()
            self.draw(screen)
            pygame.display.update()
            self.key_handler()

    def update(self):
        self.cursor.update()
        self.frame += 1
        # 画像を切り替える
        self.image = self.images[(self.direction * 2) + int(self.frame / self.animecycle % 2)]

    def draw(self, screen):
        screen.blit(self.bg, (0, 0))

        screen.blit(self.title, (((320 - (self.title.get_width() / 2)), 100)))
        screen.blit(self.start, (((320 - (self.start.get_width() / 2)), 300)))
        screen.blit(self.image, (self.x, self.y))

        self.cursor.draw(screen)

    def key_handler(self):
        for event in pygame.event.get():
            if event.type == QUIT:
                pygame.quit()
                sys.exit()
        pressed_keys = pygame.key.get_pressed()
        if pressed_keys[K_LEFT]:
            self.frame += 1
            # 向きを左向きに
            self.direction = 0
            self.x -= self.speed
        if pressed_keys[K_RIGHT]:
            self.frame += 1
            # 向きを右向きに
            self.direction = 1
            self.x += self.speed
        if pressed_keys[K_UP]:
            self.frame += 1
            self.y -= self.speed
        if pressed_keys[K_DOWN]:
            self.frame += 1
            self.y += self.speed

if __name__ == "__main__":
    Main()
実際にアニメーションを実装するためには、分割した画像をタイミングよく切り替えて描画する必要があります。
そのため、コンストラクタでself.frameとself.animecycleという二つの変数を定義します。
self.frameは毎フレームごとに1ずつ増えていく変数で、これを使って分割した画像の切り替えを行います。
update()内に、
self.image = self.images[(self.direction * 2) + int(self.frame / self.animecycle % 2)]という計算式がありますが、これが画像の切り替えです。
画像は、以下のような順番でself.imagesというリストに格納されています。

式の意味がイマイチ理解できないときは、実際に計算してみると分かります。
例えばself.frameが10のとき、右向きでself.directionが1のとき、式の値は
(1 * 2) + int(10 / 12 % 2) = 2 + 0 = 2
となり、要素内の3番目の画像が描画されます。
key_handler()内に、左右のキーを押したときにラビップルの方向を変える処理と、キーを押しているときはself.frameにさらに+1する処理を書き加えています。こうすることで、キーを押しているときといないときでアニメーションの速度を変え、より動いている感を出すことができます。
これで、ラビップルちゃんにまるで命が吹き込まれたかのような動きをつけることができましたね!
